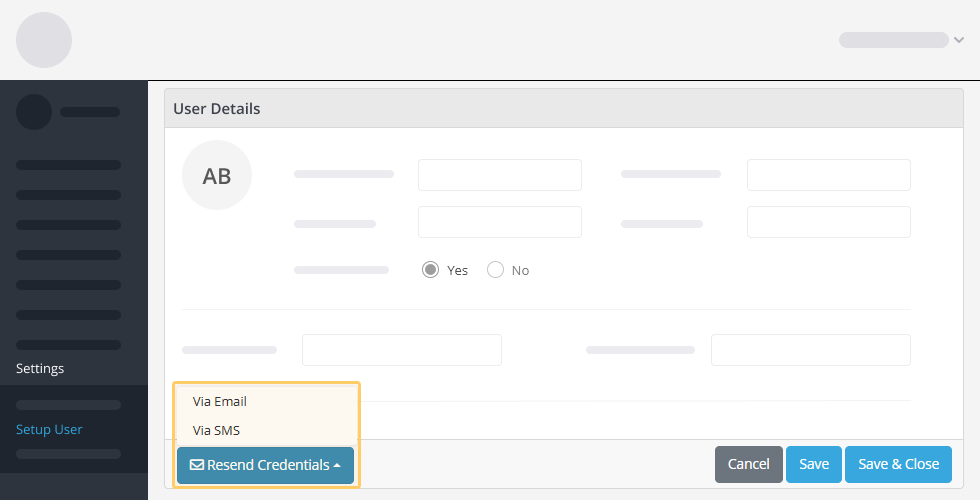
What’s New in the Portal

HomeWhat’s New in the Portal

Version 5.7.2.0

Release date 16 August 2024

Custom Logo

You can now personalise the portal by adding your company’s logo. Simply follow these steps:

Step 1:

  • Go to Settings > Global Configuration > System Tab.
  • Scroll down until you find the OEM Branding option. Set it to Yes and save the changes.

Step 2:

  • Navigate to Settings > Setup Company.
  • Look for the Company Logo option at the bottom left-hand side, upload your company logo, and save the changes.

After logging out and logging back in, your company logo will appear above the Navigation bar.

Multi Company Login

We now support Multi-Company login, allowing users to register and manage multiple companies within the same region. With this feature, you can easily switch between companies without needing to log in again.

To use this feature, simply click on your name at the top right-hand corner of the screen and select Switch Company. You will be prompted to choose the company you’d like to switch to. After making your selection, click on the Switch button, and the system will redirect you to the chosen company instantly.

Academy is now a stand-alone module

We’ve updated the Academy Module by removing the dropdown and making it a standalone Module. Along with this change, we’ve added the “Take a Tour” option, previously found in Quick Start, below the Ping and Incident videos. This feature allows you to watch the video and then follow a step-by-step guide through the Module.

Initiate a Conference call with Task Assignees

You can now initiate a conference call directly with assigned users for a task from the Task Assignees option in the Control Centre. This feature provides the Incident Manager with quick and easy access to start a conference call with task assignees whenever they need to gather more information regarding the Task.

Improved Incident Audit Log

We have updated the Incident Audit Log by adding a new feature. You can now click on locations to open a popup with a map that displays all impacted locations selected at launch.

Task Status

We have added a new section on the Task Setup page to help users quickly identify whether tasks are Active or Inactive. To view this, navigate to Settings > Setup Incidents > Incident Task Tab. On the dropdown for RPO and RTO at the top of the page, you can easily see the status of the Incident Task. If a Task is inactive, simply click the dropdown, switch the Task Enabled option to Active, and save your changes.

Email Templates

We’ve updated the Email Templates feature to allow users to edit templates in their preferred language. To customise an Email Template in a specific language, navigate to Settings and select the Email Template option. Once on the Email Template screen, choose your desired language from the dropdown menu in the top right-hand corner. You can choose one of seven languages, English, Spanish, French, Italian, Polish, Turkish and Arabic.

Channel Templates

We’ve added a new section in the Settings menu that allows users to customise SMS and Voice templates for notifications received by users. To make the most of this feature, follow these steps:

  • On the login screen, select your preferred language, then log into the system. You can choose one of seven languages, English, Spanish, French, Italian, Polish, Turkish and Arabic.
  • Go to Settings > Global Configuration > Communications Tab. Scroll down to the Default Language for Communication option and choose your desired language for the system.

Next, navigate to Settings > Channel Templates. Select the language you want to edit by choosing the appropriate option from the dropdown in the top right-hand corner of the page.

QR Code Registration

The QR Code Registration feature is a powerful addition to the system, offering two key functionalities: User Registration and Visitor Registration.

User Registration:

This feature allows users to register by scanning a QR code with their mobile device. The QR code directs them to a page where they can fill in their details and submit them for approval. Once approved, they are automatically added to the system. This is ideal for registering permanent and temporary staff, interns, or contractors. This simplifies the registration process, eliminating the need for Admin users to manually add individuals or updating and uploading spreadsheets every time a new user needs to be added to the system.

Visitor Registration:

This feature integrates with the Public Alert Module, this enables companies to provide a QR code for daily visitors who wish to receive notifications. When a visitor scans the QR code, they are redirected to a page where they can enter their mobile number. After submitting their information, they are added to a specific Public Alerts list. If an Incident occurs, the person managing the Incident can choose to notify these visitors. To do so, simply navigate to the Public Alert page, select the desired group to notify, and after clicking on the next button, the system will proceed to the messaging page where you can enter the message that you would like to send out, then the user can proceed to send out the alert.